Running a test calculation on Lux
Run
For build information, go to How to build Cholla on Lux
Create a directory outside of cholla/ to run the test calculation in. We’ll call this run/
In the run/ directory:
Add
run.sh:
mpirun -np 2 ./cholla.cosmology.lux parameter_file.txt
Add parameter_file.txt
#
# Parameter File for the 3D Cosmological Hydro.
#

######################################
# number of grid cells in the x dimension
nx=128
# number of grid cells in the y dimension
ny=128
# number of grid cells in the z dimension
nz=128
# output time
tout=1000
# how often to output
outstep=1000
# value of gamma
gamma=1.66666667
# name of initial conditions
init=Read_Grid
nfile=0
#Cosmological Parameters
H0=67.66
Omega_M=0.3111
Omega_L=0.6889
Omega_b=0.0497
scale_outputs_file=/path-to-cholla/cholla/scale_output_files/outputs_single_output_z0.txt
# domain properties
xmin=0.0
ymin=0.0
zmin=0.0
xlen=50000.0
ylen=50000.0
zlen=50000.0
# type of boundary conditions
xl_bcnd=1
xu_bcnd=1
yl_bcnd=1
yu_bcnd=1
zl_bcnd=1
zu_bcnd=1
# path to output directory
indir=/data/groups/comp-astro/cholla/ics_2_z100/
outdir=./data
# UVB photoionization and photoheating rates
UVB_rates_file=/path-to-cholla/cholla/src/chemistry_gpu/uvb_rates_V21.txt
# density floor
density_floor=1.0e-05
# temperature floor
temperature_floor=1.0e-03
A full explanation of the required parameters is given here. Additional cosmological parameters can be set if desired. Note that you must add the path to your installation of Cholla for the scale_outputs_file and UVB_rates_file. The scale_outputs_file simply has a list of scale factors at which outputs are written to hdf5 files. For this example, there is a single output when a=1.
Link the executable (still within the /run directory):
ln -s /path-to-cholla/cholla/bin/cholla.cosmology.luxCreate an output directory,
data.Run the code
After getting a GPU node on Lux, and ensuring that we are in the run/ directory, we can run the code by using ./run.sh
See cosmo-cholla/setup_files/gpuq.sh for an example of how to get a node on Lux.
Outputs
After the simulation is complete (~ 1 minute), there will be one set of outputs (in run/data/1). In general, a directory will be created inside of the run/data directory for each output time given in the scale outputs file. Here we find six hdf5 files:
1_gravity.h5.0
1_gravity.h5.1
1.h5.0
1.h5.1
1_particles.h5.0
1_particles.h5.1
As there is one type of output (gravity, hydro, particles) per processor, we need to concatenate each type. This can be done by using the python scripts provided in the main Cholla repo, within cholla/python_scripts. If you have the files concat_3d_data.py, concat_internals.py, and concat_particles.py from cholla/python_scripts either in your run directory or added to your path, you can run the concatenation with sbatch concat_h5.sbatch.
concat_h5.sbatch is provided below and also included in cholla-cosmo/docs/visualizations.
#!/bin/bash
#SBATCH --job-name=cholla       # Job name
#SBATCH --partition=gpuq  # Partition name
#SBATCH --account=gpuq    # Account name
#SBATCH --ntasks=160            # Number of MPI ranks
#SBATCH --nodes=4               # Total number of nodes requested
#SBATCH --exclusive             # Prevent other jobs from running on a node
#SBATCH --ntasks-per-node=40    # How many tasks on each node
#SBATCH --time=24:00:00         # Time limit (hh:mm:ss)
#SBATCH --output=concat_%j.log  # Standard output and error log

module load python37

export NUM=1
python3 concat_3d_data.py -s data/$NUM -o data/$NUM --dtype float32 -n 2 -c $NUM
python3 concat_particles.py -s data/$NUM -o data/$NUM --dtype float32 -n 2 -c $NUM
Note that NUM is set to 1 as there was only one output time, and we set -n 2 as there were two processors.
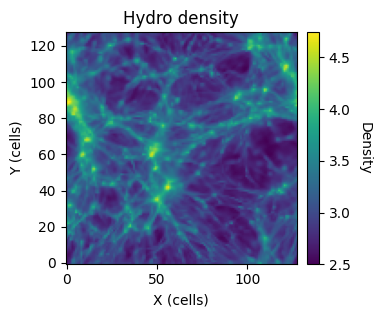
This will concatentate 1.h5.0 and 1.h5.1 into 1.h5, the complete hydro data file. 1_particles.h5.0 and 1_particles.h5.1 will be concatentated into 1_particles.h5, the complete particle data file. From here, we can visualize the results. An example notebook is provided here and the density projection along the z-axis of the hydro data is shown below.